I think that BYOD (Bring Your Own Device) is such an excellent way for students to be able to use technology in the classroom. Technology is a great motivator, and students can explore and understand the standards in their own way and at their own pace. As stated by Liu et al. (2014) “Mobilized learning allows for existing curricular objectives to be addressed in a seamless technology-integrated learning environment with a student-centered focus” (p.356). I think that technology can benefit the students at home and school if they are using the correct tools and it is a seamless integration. The only way to ensure that the tools are effective and that teachers are integrating technology the right way is to make sure that teachers are educated on the most effective means and how to use them.

Tools
The first tool that I investigated wasPadlet. In the past, I have heard of Padlet, but I had never used it. Once I created an account, Padlet was very simple to use. I created a Padlet so that the teachers on my grade level can add resources so that we can all share what we are using in our classes. I created a section for each subject that we teach (Reading, Math, Social Studies, Science, Writing, Other) and started to add some of the resources that we have used in the past. I was even able to make it password protected which would be useful if you were having students use this tool in class and you wanted to protect their privacy. I think this is such an excellent tool for professional development for a technology coach because you could have teachers go on a Padlet during meetings and look at various posted pictures, links, and videos. You could also use this in a classroom for group work and for students to display their resources so that others in the class can find them. High School would be the best place to use Padlet because they can save and share their information with others. With Padlet, you could use it to support students with diverse learning needs very easily. One great way would be to use it with students that are English language learners. You could create a bank of pictures and videos that have commonly used words. Students could access it to help them practice their English as well as communicate with others. Because it has categories, you could categorize the words into topics to make them easier to find. When using Padlet with students, I would manage it by frequently checking the page. I would want to be sure that all of the resources that are posted are still active links and that students are not going to sites other than the ones that are on the Padlet. I think the biggest challenge with this tool would be that younger grade students could not post their information on the Padlet because they are not allowed to use google to just search. If I used Padlet in my classroom, I would use it as a tool for students to click on different sites that would be the best use in their research.
The first tool that I investigated wasPadlet. In the past, I have heard of Padlet, but I had never used it. Once I created an account, Padlet was very simple to use. I created a Padlet so that the teachers on my grade level can add resources so that we can all share what we are using in our classes. I created a section for each subject that we teach (Reading, Math, Social Studies, Science, Writing, Other) and started to add some of the resources that we have used in the past. I was even able to make it password protected which would be useful if you were having students use this tool in class and you wanted to protect their privacy. I think this is such an excellent tool for professional development for a technology coach because you could have teachers go on a Padlet during meetings and look at various posted pictures, links, and videos. You could also use this in a classroom for group work and for students to display their resources so that others in the class can find them. High School would be the best place to use Padlet because they can save and share their information with others. With Padlet, you could use it to support students with diverse learning needs very easily. One great way would be to use it with students that are English language learners. You could create a bank of pictures and videos that have commonly used words. Students could access it to help them practice their English as well as communicate with others. Because it has categories, you could categorize the words into topics to make them easier to find. When using Padlet with students, I would manage it by frequently checking the page. I would want to be sure that all of the resources that are posted are still active links and that students are not going to sites other than the ones that are on the Padlet. I think the biggest challenge with this tool would be that younger grade students could not post their information on the Padlet because they are not allowed to use google to just search. If I used Padlet in my classroom, I would use it as a tool for students to click on different sites that would be the best use in their research.
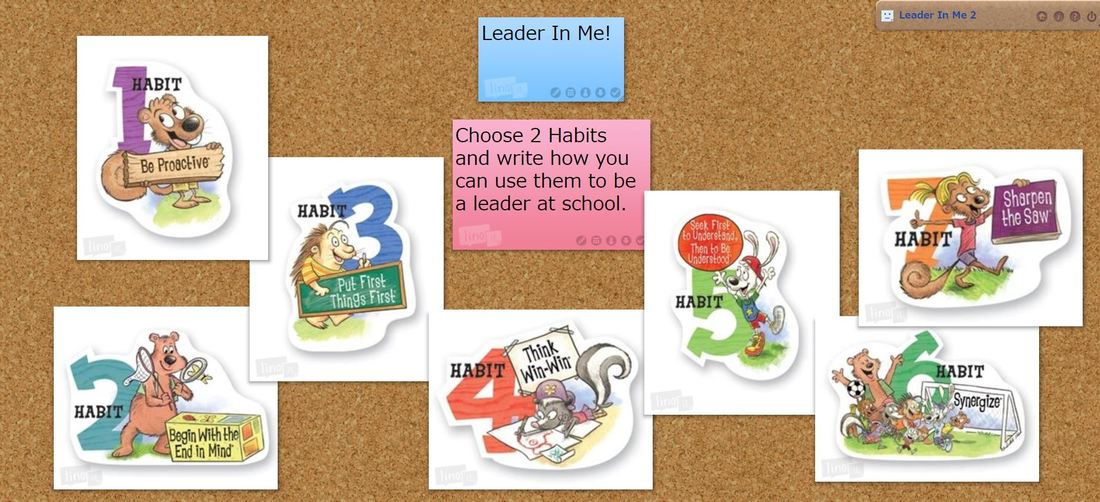
The second tool that I was able to explore wasLino. This is a virtual pinboard. I created a pinboard with images about Leader in Me. With Lino, students can look at the pinboard and access information, and they can also add sticky notes to the board. I think this tool is an excellent motivator for students because they love to use tools on the computer. In my example, I would have students type their response on a sticky note and add it to the pinboard. Students would enjoy adding their thoughts for others to see. This would allow students to read what others were posting and then add their ideas. I think that it is a great visual for students and a great motivational tool. Students with diverse learning needs that need visuals would benefit from Lino because you can add pictures, videos, and words to get your point across. The pinboard would be useful to hit multiple learning styles in the classroom and help them understand the information. I think that one of the best ways for students to use this tool would be in a group setting because then there would be less sticky notes on the pinboard and students would be able to monitor group members and what they post. One of the challenges would be that students could post something inappropriate on the board without a teacher being able to see it because students can post “live.” I have found that the best way to help with that is to put students in groups. Elementary students are less likely to post something inappropriate when others are watching. I think this tool would be a fun way to incorporate collaboration between teams.
Another tool that I used was iMovie. This app lets students/teachers create videos and movie trailers about anything they want. It is straightforward to use because it has a template. You just have to have the pictures and videos saved on a device, and the students can click and add them into the already made model. I created a trailer about the Explorers- Social Studies for students to watch in my class. For teachers, this would be a fun way to introduce a topic to students. I would use the trailer I made to present the explorers we were going to talk about. For students, this app could be used as a culminating project for a unit. The students could create their own trailer about an explorer and tell facts throughout the trailer. iMovie would be a fun tool for students to get to share with the class when they are finished. iMovie is great for students with diverse learning needs because of the simplicity. Students do not have to add a lot of words but just pictures to get their point across. I would manage this tool by having a bank of images already saved about the topic so that students were not searching the internet for any picture. They could use the photos that were previously saved on their device to create their unique video/trailer. I would also be sure to have checkpoints throughout the process of making their videos. Students would have to check in with a teacher to be sure they were following directions. The challenges of this app would be the time it took to set up. For a teacher, it would take a while to get pictures saved on every device for students to be able to use. With that being said, I think the motivational aspect and the excitement for students who get to make their own video outweigh the challenge of prep time. I cannot wait to get started using this tool.
| video-1509041612.mp4 |
Screencasting
I used Screencast-o-Matic to create a screencast about a tool used for assessment called Kahoot. Kahoot is a fun way to formativly assess students on a topic you are talking about (see screencast to learn more). Initially, I thought that screencasting seemed intimidating and I was unsure of how difficult it would be to use. After now making one, I found it very simple. When using the program Screencast-o-Matic, it was simple to download the tools that you needed and then the directions were apparent. The hardest part about screencasting is that you have to be prepared before you start or you have to redo your screencast multiple times. I made sure to write out what I was going to say before I started and it went smoothly. I enjoyed learning about screencasting, and I think that it is a great tool to use in the classroom and for professional development.
One way that I could use screencasting with my students would be to use a flipped classroom model. I would love to make screencasts of math techniques and have students look at them at home. The flipped classroom would give me more time in class to practice with the students instead of teaching new math techniques. The second way I would use screencasting in my classroom is to help parents understand topics. A lot of times parents ask about common core and how it is different than what they learned in school. They often tell me that they only know how to teach their students how they were taught in school not how we show it now. Screencasting would be a great way to educate parents. I could make videos about what we are learning and post them on my eClass page for parents to view. One last way I would use screencasting is for professional development. We have meetings that require a teacher to have a substitute teacher for a day to show the other grade levels tools that they use in their class. Screencasting would be an excellent way for teachers to stay in their room and still be able to show their tools. They could make a screencast about a resource, and then during the meetings, the other teachers could watch the screencast instead of that teacher being there to go over each step. I think many teachers would prefer using a screencast rather than leaving their classroom. Screencasting is a great tool, and I am excited to practice more with it and get better and better at using screencasts with my students.
Resources
Liu, M., Scordino, R., Geurtz, R., Navarrete, C., Ko, Y. & Lim, M. (2014). A look at research on mobile learning in K-12 education from 2007 to the present. Journal of Research on Technology in Education 46(4), 325-372.
Liu, M., Scordino, R., Geurtz, R., Navarrete, C., Ko, Y. & Lim, M. (2014). A look at research on mobile learning in K-12 education from 2007 to the present. Journal of Research on Technology in Education 46(4), 325-372.


 RSS Feed
